
When you write and publish blog posts, they can be published in categories. I say ‘can be,’ because technically, you can publish as many posts as you want and leave them all uncategorised.
However, to make your blog posts organised for you as the blogger and easy to find for your reader, I’d highly recommend organising your posts into categories.
You don’t need to have every category planned and sorted as soon as you start your blog. And it’s ok for your blog categories to evolve over time. But starting out with a few categories helps with the structure of your blog and gives you focus for your posts.
To choose your categories, I’d suggest thinking about what it is that you want to write about and then thinking about what the main ‘umbrella topics’ are. These topics will form your categories.
How Many Blog Categories Should You Have?
Some bloggers recommend having only 3-4 categories, whilst other bloggers have no problem with having 10+ categories.
I suggest starting with as many as you need. You might want to start small, and add categories as you go.
Equally, you might already have a very clear idea as to how many categories you need from the start and want to set up all of the categories when setting up your blog.
This is my approach, but there’s no one-rule-fits-all here.
As I said, these categories can evolve over time, and you can add in sub-categories as your blog post archive grows.
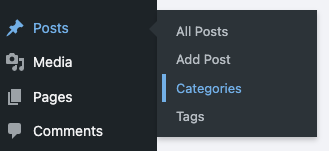
Step 1 – Locate Your Blog Post Categories
To set up your blog’s categories, hover over ‘Posts’ in the left-hand menu on your WordPress Dashboard, and click ‘Categories.’
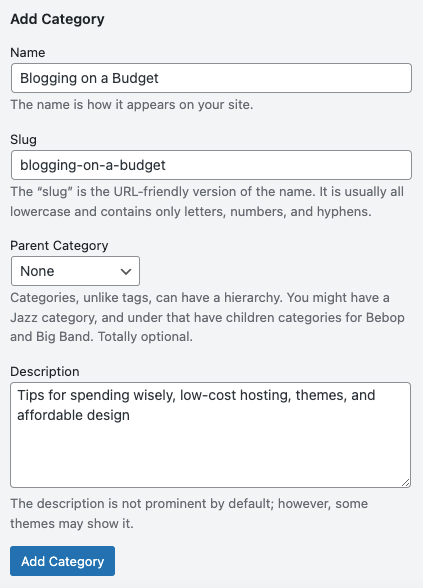
Step 2 – Enter Your Category Name
In the Category screen, enter the information for the blog post category you want to set up.
In this example, I’m setting up the category ‘Blogging on a Budget,’ where all of my budget blogging blog posts will be listed.
Enter the name of your category, and if you want, enter the slug. If you don’t populate this line, WordPress will make a slug for you based on your category name. The slug is what appears after the URL name. It’s advised to put a ‘-‘ between each word to make your slug more readable.
If you want to add your category as a sub-category, select the category you want it to sit under in the ‘Parent Category’ drop-down. If this isn’t a sub-category, leave this as ‘None.’
Step 3 – Add a Description (Optional)
In the description, give a quick sentence or two describing what your category is about. Whilst not strictly necessary, I find this exercise useful as it really helps me to nail exactly what the category that I’m creating is about. Also, some themes use this information in your blog post category pages.
Once you’ve added all this information, click ‘Add Category.’
You’ll then see that your category has been added to the category list.
Editing Your Category
To edit your category, simply click ‘Edit.’ You can also delete the category from this screen if you ever want to. Just so you know, deleting a category does not delete the blog posts in that category.
The count at the end of the row counts how many blog posts you have within that category.
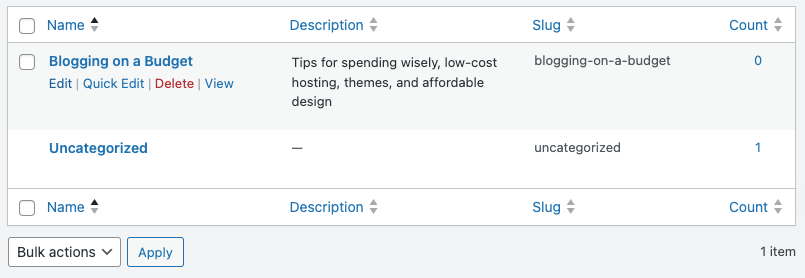
A Note About the ‘Uncategorized’ Category
You have to keep the ‘Uncategorized’ category. Any blog post that doesn’t have a category assigned to it will automatically be added to ‘Uncategorized.’
You can, however, add a description if you’d like to make this category more personal. I usually like to write something like; ‘Oops! Looks like we forgot to categorise these blog posts!’ But that decision is entirely up to you.